Coming soon to a gallery near you! by Emily Schroeder Willis

Friday, March 1st I will have my first exhibition in Chicago! Yes, it’s true I have had my studio open, but I haven’t shown my work in an “official” gallery type setting here. I will be showing my shield sculptures and a 2 wall pieces at a new gallery located in Roscoe Village called “Old Friends”. It is located at 3405 North Paulina, just off the Paulina Brown Line stop.

If you are around next Friday from 5-9, please come over and say hello!

xo

Here are the 2 cuties who run Old Friends.


A More Sustainable Studio by Emily Schroeder Willis

Over the past four years, I have grown increasingly frustrated by the lack of environmental action that our government has taken, or worse yet, back tracked on. I have been angered by companies who make choices about money and not about the health of their workers or the environment. One day, I realized that if changes needed to happen regarding environmental issues, I should start with my own studio. So, I am going to start posting here some of the things that I have learned and found to be helpful. By NO MEANS am I an example, but rather trying things out and doing the best I can. In a book I recently read, the mantra was “Pray as you can, not as you can’t.” And I feel like that is a good life rule. Do what you can, not what you can’t. If you can’t take these steps at this time, do what you are able! Every small step is a GOOD step! I am going to try and list tips in order of easier steps first to steps that take a bit more intention and possibly money.

So, I feel like I should take you to where this all really started…

I watched this TED talk and was pretty amazed. I couldn’t believe that this family could live a life and only have that little waste. The biggest take away though I started with was REFUSE. Figure out the things you can do without in your studio. This might be REFUSE the catalogues that come to your studio (have you seen those Uline catalogues! Sheesh!). Unsubscribe from their mailing list! This can be time consuming, but think about all of those wasteful little things that get thrown in the trash/recycling. And this was the beginning where I sadly began realizing that most “recycling” doesn’t get recycled.

“Sixty-six percent of discarded paper and cardboard was recycled, 27 percent of glass, and 8 percent of plastics were recycled. Glass and metal can be recycled indefinitely; paper can be recycled five to seven times before it’s too degraded to be made into “new” paper; plastic can only be recycled once or twice—and usually not into a food container—since the polymers break down in the recycling process.”
Source: https://blogs.ei.columbia.edu/2020/03/13/fix-recycling-america/

Plastic is one of the absolute worst offenders since it simply doesn’t break down.

In America, we have for the most part easy accessibility to stores/shopping AND most things are cheap, so rarely do we fix that paintbrush that got broken. We just throw it in the trash, head to Blick and buy a new one. OR order it off of Amazon and have some truck drive 15 miles to drop it off in my mailbox in a plastic padded envelope that I then throw in the garbage.

So, Tip #1: Refuse the mailings that you get coming to your studio. See if there are ways you can simply stop the junk mail from making it to you mailbox. Change your bank statements to online ! Once every few months, I will gather up all of the catalogues I get and go to their websites and contact them to remove me from their mailing list. It takes a little bit of digging and some time, but in the end it has greatly reduced the amount of junk mail we get.

Tip #2: Refuse to fire the pieces you know are doomed. If you work in clay, you know exactly what I am talking about…Those pieces that already have the tiny cracks in them that are only going to get bigger…the piece where you broke something off and are praying to the clay gods that something is going mysteriously heal it. Remember, that all of that bisqueware will be landfill. We know this because we dig up terra cotta pots that were fired thousands of years ago! I tell my students at the beginning of the semester to be mindful of what you fire. All of the stuff we make that we fire in the kiln is transformed, it becomes part of the planet in a different way. Edit your work when you are putting things in the bisque! If you aren’t sure about it, consider it to be a good practice piece and then toss it into your clay recycling bin to be made into a vessel another day.

Tip#3: Refuse to buy new! I keep a bottle of Gorilla Glue to fix all of those pesky paintbrushes that I have left in a bucket of glaze for too long that wiggle loose and come undone. I know this isn’t a non-toxic glue, but it is TOUGH and it can hold things together indefinitely, which is one area that I have made a trade off. But also try and REFUSE to buy new boxes! See if there is a way that you can reuse old boxes. Perhaps the business next door has a lot of shipments coming and they have great double corrugated pristine boxes that they just throw away (you never know!) This is actually what happened to me so, I would reuse their boxes which were perfect for large shipments of work. If you work in a large building, I am certain there are boxes you can recycling and give new life to.

Here you can see the difference between the MDF (bad)  and MDO (good!)

Here you can see the difference between the MDF (bad) and MDO (good!)

Tip#4: Create spaces with long term intention.

This in and of itself will create less waste and save you time! When I buy something I want it to last me 15 years without worry. About 10 years ago, I learned about a material called MDO (Medium Density Overlay). I taught at the Alberta University of the Arts and their ceramics department used this material on all of their tables and as all of their bats. And I have to say, I am a TOTAL convert. This material is incredibly durable! It has a paper surface so it doesn’t absorb water like MDF. It doesn’t warp. It doesn’t hold onto dust and it is slightly porous so you don’t need a canvas surface to help with sticking as you wedge on it. Also, the added bonus is that since it doesn’t have canvas on it, you eliminate a lot of the dust in your studio since you can wipe it totally clean! And think about the time and waste of those canvas tops! It is VERY durable and I use an X-acto blade on the surface of this and while it does leave a faint mark, it by no means ruins the surface if you cut directly on it.


Tip#5: Try to eliminate plastic where you can.

Well then, how can I ship my work? Don’t I need bubble wrap and tape?
Good question! About 8 years ago I left the world of bubble wrap because I hated that it wasn’t reusable over a long period of time (those bubble pop and deflate, right!?). So, I switched to a foam alternative that allowed me to reuse the foam indefinitely. I read somewhere that when using plastics to consider whether or not that the amount of time you actively used, if it was worth the amount of years that it will exist on this planet. Think on that for a minute (especially when you are grabbing for those thin plastic bags at the grocery store). While its GREAT that I have been able to use the same piece of foam for years, I realized that when I ship work out to someone who is purchasing the work, they most likely just throw it in the trash. Also, in order to hold the foam in place, I needed to use Stretch Wrap, which is essentially a short roll of Saran Wrap on a stick; another use of single use plastic that can literally NEVER be used again. Sometimes I would reuse the rubber bands that I acquired from the produce at the grocery store as an alternative to stretch wrap, but I would often need more than I could collect. I have never really like using this foam because it also takes up an immense amount of space in my very modest studio. So this summer, I came across this!

A Geami!

I have known this as a Geami because many moons ago I worked at Crate and Barrel and they used a more industrial version of this Geami to ship work out to customers. I always thought it quite weird that they didn’t use bubble wrap or foam wrap, but in hindsight, they actually had pretty sustainable practices considering how much product they were shipping out ALL THE TIME. Anyhow, I discovered a company called EcoEnclose was selling these and they were shipping them in the same box you used (no excess packaging!). It’s SUPER compact and it is 750’ of length of paper. Here is a link to the one that I bought. I know that Amazon sells this, but it’s actually cheaper to get it through EcoEnclose because you are getting almost 2x the amount. Also, here is a link for a coupon to get $20 off ECO ENCLOSE Geami

The vase in question!

The vase in question!

Full disclosure, when I bought this Geami I wasn’t sure how it was going to hold up with shipping and I didn’t want to buy this only to find out it didn’t work, so I simultaneously ordered this and a huge roll of foam wrap. I shipped some small things by themselves at first with the Geami paper and didn’t have any reports of breakage. Then I shipped some larger platters and still everything arrived just fine. The coup de grâce was when I shipped this vase using only the Geami paper and craft paper to a gallery along with about 12 other items and nothing broke. After that, I realized, this is truly a green alternative that works! My only problem now is that I have a huge roll of foam wrap in my studio. Oh, well! I can use it up and then never buy it again.

Another place where plastic is very pervasive is packing peanuts. Over a year ago, I eliminated using packing peanuts in my studio as well. I switched to using a 40# craft paper roll that I crumple up and put around the work. Mine is 18”, but I would say, 24” would be ideal for most people. You will need to get a dispenser to go with it. I bought mine from a local paper packaging company, but here is one from EcoEnclose that has the paper and the dispenser for a 24” width. The other great thing about this is that it takes up so much less space than that huge bag of packing peanuts! I will also often use this paper in helping me to protect more fragile items as well. Its very multi-purpose! And I have been known to use it to wrap a Christmas present or two…. just saying, it’s great stuff!

Max Seinfeld’s globe trotting box!

Max Seinfeld’s globe trotting box!

Now on to the area where I haven’t quite found the sweet spot. TAPE. Think of how many rolls of tape you use when shipping work off during the year? One roll? A case? Two cases? A carton? It’s a lot and often times you don’t even think about it. I love this image of Max Seinfeld’s box that has traveled all over the world. It makes me laugh because it is definitely more tape than box at this point :) But you get the point. As artists, we use a lot of tape! And that tape never degrades. It never goes away and just stays part of our environment.

Many of the green alternatives I have tried thus far with bubble wrap and packing peanuts have been similar in cost or only a slightly higher cost, but they actually saved me space, which is a savings in its own way. But TAPE is the spot where I have tested out a few products and not quite gotten the results I have wanted yet, but it has led to me to know where I want to go.

This is the water activated tape with the manual dispenser. They have super fancy ones that run into the $$$$, but this will do.

This is the water activated tape with the manual dispenser. They have super fancy ones that run into the $$$$, but this will do.

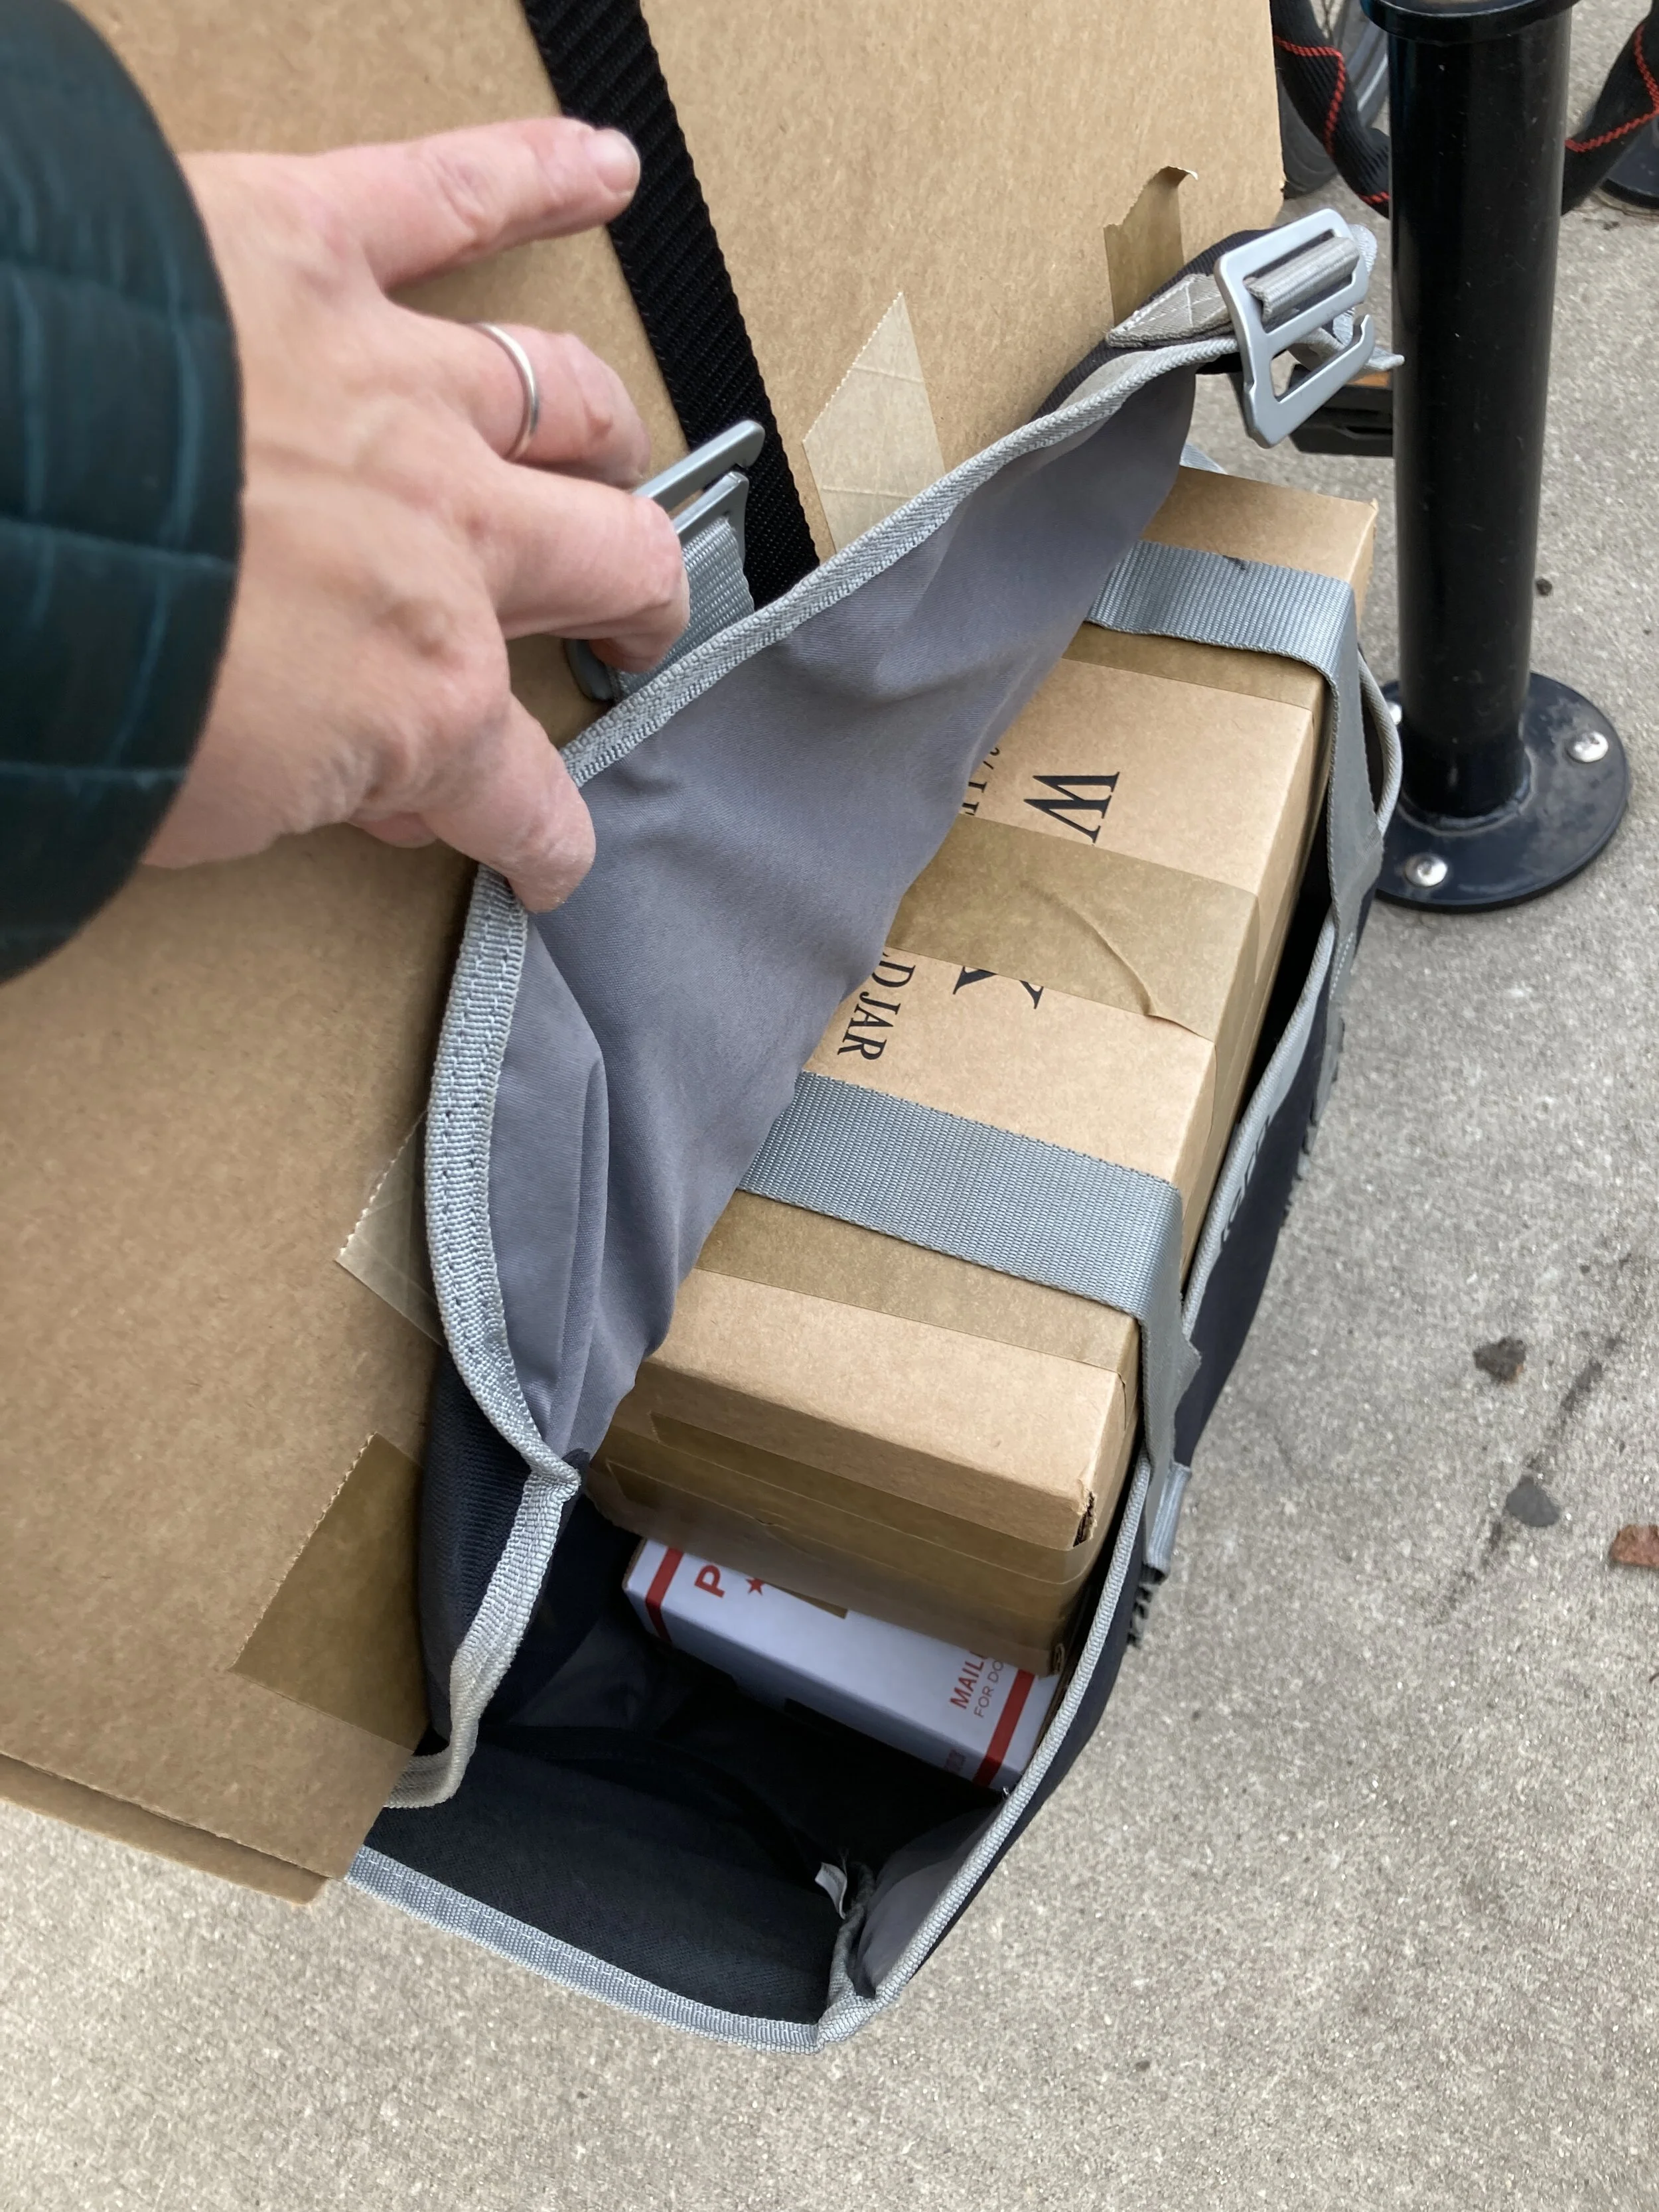
During this journey I didn’t want to make the investment in buying a water activated tape dispensers since they run over $100 just for the dispenser and that doesn’t even include the tape! But if I am trying to think long term both as a studio practice and environmentally, I have realized that I may need to fork over the money. These machines work by having a paper tape that is activated by water. Its that same tape that when you are wrestling to open that Amazon box with the black and blue tape you practically bloody you hands on. But that’s the point! It works! And it works with one strip, not three strips running one way and another 2 or three going the other direction. It’s strong and lasting and you end up using less of it in the long run. Because I didn’t want to invest in that tape dispenser, I have tried 2 different self-adhesive paper tape options. The first being this one by EcoEnclose. It' didn’t feel very sturdy/durable to me and I had a few instances where it tore. It felt more like a heavy duty masking tape than a packing tape.

Next, I decided to branch out and try this one by NetZero. I really disliked the NetZero tape for many reasons. First, they say that they ship from California, which made me believe that they were manufacturing it in CA, but in fact, the 2 rolls of tape that I ordered came from China! Which completely negated the reason for using the tape (The EcoEnclose tape is made in the US)! Also, the surface on the NetZero tape is a very funny plastic and you are unable to write on it with a permanent marker. Lastly, it didn’t stick all of the time! This past week, I was packing up 40 boxes of work to ship to people and I was doing it in small batches and the next day I would come back, I would find several boxes that had come undone. So, I would definitely NOT recommend NetZero. Eventually, I am going to buy that tape dispenser and I am going to get that other paper tape, but in the mean time, I have a roll left of this crummy NetZero paper tape….

So, still on the topic of shipping, Doug Peltzman kind of revolutionized shipping in the Objective Clay world. This is a simple, “How you can save yourself some serious cash” Tip and a little on the environment too.
A little less than a year ago he taught us all the miracle of shipping through Paypal. You need to get a business account (which is free) and from there you are able to print and ship mailing labels with USPS and UPS for a very discounted rate. It is a savings of about $1-6/order depending. It’s pretty remarkable. Especially if you are trying to ship in bulk. The other Doug Peltzman tip is the Rollo Thermal Printer. And while again, it seems excessive to spend $200 on a printer, note that it doesn’t use ink cartridges. Yes, you read that correctly. It doesn’t use INK. Instead it uses heat to print on the paper making the labels water resistant. How much does an ink cartridge cost for your printer? Mine runs about $50/cartridge. Which means it can save me money over the long term. Also, I no longer have to tape over the label (bye bye plastic!) or use a plastic sleeve to hold it in. I recently had an order lost because my shipping label fell off. Fortunately the package did come back to me because apparently I hadn’t removed a label that was thermal printed on the box and my address was showing…. so, another win for the thermal printer! I have my Rollo coming this week and I am very excited to test it out! I recommended it to a friend who was starting a new business and she has been raving up and down about it, so I feel like I won’t be disappointed. From what I can also tell, you even get more discounted shipping rates if you use their printer too. Seems too good to be true!

Doug also just emailed me about another tool he is purchasing for his studio. This is a cardboard shredder. It’s a SIGNIFICANT investment, but it will essentially make the need to purchase packing materials obsolete. I’m excited to see how this works out for Doug!

I feel like I have to give props though to so many others in Objective Clay. I remember at the last (in person) NCECA in 2019, gwendolyn yoppolo had shipped all her work to the conference with plastic-free sustainable/renewable materials and I thought she was a little crazy! But, it really got me thinking about what I could do, and that girl was on to something! Here is the list of environmentally friendly packing material gwendolyn uses.

“I was using this Cellulose wadding from Uline (not the most sustainable of companies, admittedly, but that is who she was using back then) - it is100% recycled and recyclable. That was the first layer, underneath some corrugated cardboard wrap. I've shipped things across the country using these, along with corn starch peanuts, and never had breakage. Before this, I had been using foam and traditional peanuts, and hating how they felt and smelled and how wasteful they were.”

Bricks from Rat City Studios!

Bricks from Rat City Studios!

Tip #6: REUSE your clay and glaze
Another OC member, Bryan Hopkins made an awesome rant on Instagram about the importance and cost savings of recycling your clay. He talks about how when you throw clay in the garbage, you are really throwing money into the garbage. He demonstrates how little clay scraps can be reused to make a cup. You can listen/watch it here. But be warned! There is cursing in it :)

Another OC superstar is Deb Schwartzkopf and she has a really unique way of recycling/reusing clay and glaze from her studio (Rat City Studios). On the Rat City Blog one of Deb’s assistants Canne Holladay shows how to make a brick/paver mold in this post, while Rickie Barnett made an accompanying post titled “Turning your Waste into Want” where he describes how to repurpose the scraps of clay and glaze into a combined material that can be used to make paver tiles for your garden! It’s really amazing!

In my own studio, I simply have a big bucket that I toss all of my clay scraps in. And when I am out of boxed clay, I mix up the scraps and use the recycled clay. I have a big plaster slab that I dry out the recycled clay on. I mix the scraps with water until it is the consistency of chocolate pudding and then smear it on my plaster slab. That way, I make sure all of the clay is properly hydrated. As for my glaze scraps. I keep some bisqueware that has small cracks in it (only bowls) that i then use to dump in my glaze test that I don’t ended up using. I then bisque fire them which makes the glaze a solid mass. While this isn’t ideal, it at least prevents any toxicity from getting into the ground or the ground water.

Tip #7: Get Rid of Your Car!

Wouldn’t it be great?! I am only slightly kidding here, because if you follow me on Instagram, you will from time to time see pictures of me biking around Chicago on my bike loaded up with pots. We have always loved biking in the city, but a year and a half ago we bought a Tern GSD and it has changed our world. It’s our “second car”, but without the gas and truly sees more use than our actual car. I think many times I have been tricked into thinking that we need a big car to “haul all of my stuff”, but truly most of the time, my cargo bike serves me pretty well (full disclosure, we do indeed have an SUV, but this past year we put 3,000 miles on our cargo bike. Just saying). I have definitely been seen biking through Wrigleyville on game day with a few 30 pound boxes strapped on. Here is a great example of my bike loaded down with pots and kid.

But here’s the truth. Whatever changes you make whether BIG (no car!) or small (fixing up those studio tools!) or somewhere in the middle (not using packing peanuts anymore!) these are all good steps and you should pat yourself on the back.

And like I said at the beginning, do what you can, not what you can’t. Maybe you can’t eliminate all of these things at this time because of money (there is definitely a cost to going green), but in the areas where you can make a difference, please do!

Thanks for reading!

Taking 8 boxes to the UPS store on my bike.

Taking 8 boxes to the UPS store on my bike.

Where those 8 boxes hide.

Where those 8 boxes hide.

For a better understand of scale.

For a better understand of scale.

My bike co-pilot and studio assistant in the making.

My bike co-pilot and studio assistant in the making.

Haystack Workshop in June by Emily Schroeder Willis

This summer I will be spending 2 weeks at Haystack Mountain School of Crafts. It is my first time at Haystack, but it has been a dream of mine for many, many years. Two summers ago, I spent a month at Watershed in Newcastle, Maine and have been itching to get back to that part of the country since. The topic for the workshop is “Pinching and Playing”. We will be exploring vessels and sculpture using pinching and coiling as our main method of work. Feel free to come and mess around. Don’t feel you need a strong skill base, we will work together on figuring out the myriad of ways you can use such a simple technique. All skill levels are welcome to attend this workshop.

The workshop runs June 9th - 21st and is in Haystacks 1st Summer Session.

To sign up for the workshop or learn more, click here.

Tally Mugs, 2018

Tally Mugs, 2018

Wreath Pair, 2018

Wreath Pair, 2018

Womb Bowl, 2017

Womb Bowl, 2017

Want to see a whole lotta work? by Emily Schroeder Willis

If you are attending the NCECA conference in Minneapolis, you are in luck! I will be there at the Objective Clay booth exhibiting my work from Tuesday, March 26 - Friday, March 29th at the Minneapolis Convention Center.

I am hoping to bring close to 100 (!) pieces to the show. No conference pass is needed to see the Gallery Expo. The hours of the Gallery Expo are 6:30pm - 8pm on Tuesday night, 9-5pm Wednesday and Thursday and 8:30 - 4:30pm on Friday. At 11am on Wednesday, March 27th I will be in the Objective Clay Gallery booth giving a short (20 minutes-ish) talk about my work. If you would like to hear me talk about it or have some questions to ask me, please feel free to come by!

Most of the work I will be bringing with me will be the dark stoneware with terra sig. I am really excited about it and hope you are too!

Platter2A_2018.jpg
Mug_WB1B_2018_low.jpg

Arrowmont! by Emily Schroeder Willis

This summer I had a great time teaching a hand-building workshop at Arrowmont.  I had the best students and we had such a great time together.  Arrowmont has added a great new kiln yard and upgraded the class room facilities, so our time together was even better than ever!  It was great weather and everyone worked so hard the entire week!  On the last day we all created clay crowns, which I personally, think were the most fun! 

Read More

Getting ready for NCECA Pittsburgh! by Emily Schroeder Willis

Every year I feel like NCECA sneaks up on me...even though I know a year ahead of time when and where it will be!  I will be bringing mostly cups with me to the booth, but may also have a handful of vases, small plates and bowls.

This year I will be showing my work at the Objective Clay Gallery Booth in the Conference Hall (but it is still free and available for the public!) and at the Bradock Carnegie Library in a show titled "InVisible".  Additionally, I will be moderating a panel discussion on Wednesday during the conference about Invisible Illnesses.  Please stop by and say hello if you come by!

IMG_2494.JPG

Show is up! by Emily Schroeder Willis

 From July 15 - August 15  I will have my Solo Show "A Line Is, A Line Isn't." up on the Objective Clay website.  With more than 50 pieces to choose from, there should (hopefully!) be something here for you!

Click here to see the show!

Solo Show on Objective Clay by Emily Schroeder Willis

From July 15- August 15  I will have 20+ pieces of work available on the Objective Clay website.  Work will go on sale at 12EST! There should be several mugs, a handful of plates, some vases, some pitchers and a few bowls for your enjoyment!  Stay tuned!

Portland Baby! by Emily Schroeder Willis

It's been awhile, but just to let people know I will have a lot of pots for sale at the 2017 Portland NCECA.  I have been busy working away in my studio for the past 3 month getting it all together, so if you are in the neighborhood, I would love to have you stop by and say "hello!".  No NCECA pass is required to visit the Objective Clay Gallery Booth in the Conference Center where I will have nearly 100 pieces of work on display.  Here is a bit more information about the Conference:

NCECA GALLERY EXPO

Hope to see you there!

Studio Visit from Ceramics Monthly by Emily Schroeder Willis

I keep forgetting to upload this wonderful article from Ceramics Monthly regarding my studio. If you are in the Chicago area, please let me know and i would love for you to drop by!

"Originally published in October 2014 issue of Ceramics Monthly, pages 26-29. http://www.ceramicsmonthly.org . Copyright, The American Ceramic Society. Reprinted with permission."


Want to workshop together? by Emily Schroeder Willis

I just back last week from a lovely time in Door County, Wisconsin. I did a workshop at the Peninsula School of Art with 5 FABULOUS attendees!  We had a blast making a ton of work together and enjoying the beautiful scenery around Lake Michigan.   If you would like to do a workshop with me, I am doing a workshop at Arrowmont School of Arts & Crafts September 21-27.  Click here for info or to sign up.  Arrowmont is an incredible place to visit!

Also, I will be doing a shorter 2 day workshop at Rovin Ceramics in Ann Arbor, Michigan October 25 & 26.  Contact them at http://rovinceramics.com/ to get more information.

Here are a few of my favorite images from last week!


Moving on up! by Emily Schroeder Willis

It's now almost the end of July and I am starting to feel "officially" moved in to my new studio in the Ravenswood neighborhood. I moved in July 1st after having a one month studio hiatus and I have hurriedly been putting it together.  It's about 10 blocks north of my most recent studio on the opposite side of Ravenswood.  It's a great space with nice light, high ceilings and a really great open feel.  It's in the Bulldog Lock Co. Building (if you are in the neighborhood!), Studio #105!

I will post more pictures when it is a bit more put together, but here are a few snap shots! 

A view from the front.

A view from the front.

A view from the back. 

A view from the back.


A view of the "kitchen"

A view of the "kitchen"

A view of the other "kitchen"

A view of the other "kitchen"

If you want to stop by, I will be working in there Wednesdays, Thursdays and Fridays.  Just let me know!

Alphabet Cups by Emily Schroeder Willis

I got back this week from a month long Artist in Residence position at the University of Montana, Missoula.  There I got a great little studio space with graduate students who were warm, kind and making incredible work!  It was an inspiring time where I got to make a lot of work I normally wouldn't have had the ability to make.  I often don't get long 8 hour stretches in the studio and some pieces I made in Missoula needed to be started and finished the same day due to the delicate nature of their design. 

All of these pieces are currently on display at the Clay Studio in Missoula and available for purchase through their gallery.

All of these pieces are currently on display at the Clay Studio in Missoula and available for purchase through their gallery.

The collection that started it all!

The collection that started it all!

Another "project" I worked on while in Missoula was every morning I drank from a different cup that was in Julia Galloway's cupboard (she was my gracious and generous host!).  It forced me to try a different cup each day, looking and examining it.  Several of the artists I wasn't familiar, others were artists whose work I had always admired. I posted them each morning on Instagram (an image sharing social media platform).  I also decided to post them here, so those of you who don't use Instagram can enjoy this beautiful collection of cups!


A is for Andy Brayman

A is for Andy Brayman

B is for Birdie Boone

B is for Birdie Boone

C is for Bernadette Curran

C is for Bernadette Curran

D is for Doug Casebeer

D is for Doug Casebeer

E is for Elizabeth Robinson

E is for Elizabeth Robinson

F is for Forrest Lesch-MIddleton

F is for Forrest Lesch-MIddleton

G is for Andrew Gilliat

G is for Andrew Gilliat

H is for Sarah Heimann

H is for Sarah Heimann

I is for Ingrid Bathe

I is for Ingrid Bathe

J is for Joan Bruneau and James Lobb

J is for Joan Bruneau and James Lobb

K is for Kristen Kieffer

K is for Kristen Kieffer

L is for Lorna Meadon

M is for Meredith Brickell-Knapp

M is for Meredith Brickell-Knapp

N is for Aaron Nelson

N is for Aaron Nelson

O is for Sean O'Connell

O is for Sean O'Connell

P is for Peter Pincus

P is for Peter Pincus

Q is for Liz Quackenbush

Q is for Liz Quackenbush

R is for Rosie Wynkoop

R is for Rosie Wynkoop

S is for Jeffrey Sincich

S is for Jeffrey Sincich

T is for Sandra Torres

T is for Sandra Torres

U is for Ursula Hargins

U is for Ursula Hargins

V is for Victoria Christen

V is for Victoria Christen

W is for Mikey Walsh

W is for Mikey Walsh

X is for an "X" cup made by Fredi Rahn

X is for an "X" cup made by Fredi Rahn

Y is for "You!" (this is a picture of a cup that I made while in Montana)  I hash-tagged everything in this project with #libraryofcups and asked followers to add a picture of their own work photographed by themselves.  Please feel free to…

Y is for "You!" (this is a picture of a cup that I made while in Montana)  I hash-tagged everything in this project with #libraryofcups and asked followers to add a picture of their own work photographed by themselves.  Please feel free to add your own work to the cupboard collection.

Z is for Lilly Zuckerman.  Lilly was also staying with me while I lived at Julia Galloway's home.  As a special favor to me she created this cup just for my Alphabet Cups Project.  Thanks Lilly! I know you don't make cups!

Z is for Lilly Zuckerman.  Lilly was also staying with me while I lived at Julia Galloway's home.  As a special favor to me she created this cup just for my Alphabet Cups Project.  Thanks Lilly! I know you don't make cups!

One of the greatest parts of this project was finding these older cups of Julia Galloway's sprinkled among the wall of cup.  She told me that she kept one piece of her own from each year.  A visual record of her life's work, if you may.&nb…

One of the greatest parts of this project was finding these older cups of Julia Galloway's sprinkled among the wall of cup.  She told me that she kept one piece of her own from each year.  A visual record of her life's work, if you may.  I really LOVED this and thought  this should be shown.  So from left to right you see her most recent work trailing over to some of her first pieces.  It's quite a journey!

I hope that you enjoy these pieces as much as I did and do!  Maybe you can start your own Alphabet Cup Project with your own collection!? 

Summer Workshop at Pennisula School of Art by Emily Schroeder Willis

Just wanted to let you know that there will be another opportunity for you to take a workshop with yours truly.  This summer I will be doing a workshop at Pennisula School of Art, July 28-August 1.  It will be a pinch pot workshop.  


Here is their website (http://www.peninsulaartschool.com/), they don't have registration up yet, but you could call and let them know you are interested.